5 posts tagged with "vps"

View All Tags

How to Connect to a Server via SSH? Follow These Steps!

· 7 min read
Customer Care Engineer

SSH (Secure Shell) is an encrypted network protocol for remote control of an operating system and file transfer. It is the primary method for working with a server through the command line. On kodu.cloud servers, it is available by default. This article will guide you on how to connect to a server via SSH on Windows, Linux, and MacOS, as well as authorizing through SSH keys. Choose a section: – Connecting via SSH on Windows

Connection via SSH on Linux and MacOS with login and password

Authorization using SSH key

Placing the public part of the SSH key on the server and connecting without a password

Adding SSH keys to the billing system

13-06-connect-via-ssh

SSH Connection on Windows

Starting with Windows 10, the Windows command line can work with the built-in OpenSSH client. Before that, SSH on Windows worked through a third-party program, one of the popular clients was PuTTY. Below, we will discuss connecting through the built-in Windows 11 client, and then briefly describe connecting through PuTTY. When connecting, you can use your login and password to log in, or you can configure authorization by SSH key. Let's start with the first method, and in the second half of the article, we will learn how to use an SSH key.

SSH Connection in Windows 11 with Login and Password

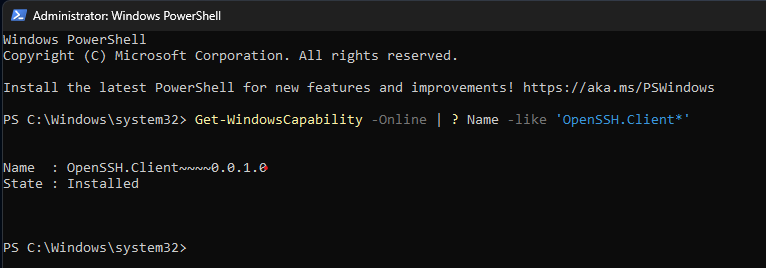
As a rule, OpenSSH is pre-installed in Windows 11 Professional Edition. In Windows 11 Home Edition, you need to install the OpenSSH client. We will use the PowerShell console to work with SSH. Open PowerShell. To do this, press the WIN (Windows flag key) and start typing "PowerShell" or find it in the list of programs in the Start menu. Try entering the command ssh. If the prompt usage: ssh [-46AaCfGgKkMNnqsTtVvXxYy] [-B bind_interface]... appears in the console, everything is fine. If the console does not recognize the ssh command, check if OpenSSH is installed using the command in PowerShell.

Checking for and Installing OpenSSH

Open the PowerShell console, selecting the option Run as Administrator. Enter the following command:

Get-WindowsCapability -Online | ? Name -like 'OpenSSH.Client*

In our case, OpenSSH is installed.
SSH incruction 1

If the command returns a result, then OpenSSH is installed. If not, install it using the following command:

Add-WindowsCapability -Online -Name OpenSSH.Client*

Or through Windows 11 settings (Settings - Apps - Features - OpenSSH Client), but this method may not work on Windows 11 Home Edition.

Connecting to the Server

Requirements for authorization on the server: server IP address, username, password. Upon service activation, you received an email with the root user access credentials. Please save them. If necessary, the root password can be reset through the billing system. In the PowerShell console, enter the ssh command with the username and server IP address.

Where root is the username and 5.45.119.119 is the server IP address. You can find the IP address in the billing system by selecting the server in the My Services section. If necessary, specify the connection port using the -p option:

After this, a password request will appear:

[email protected]'s password:

Enter the password you received by clicking on the link in the "Access Credentials" email. This completes the connection process. You can now enter other commands, and they will be executed on the remote server.

❗ Attention: When entering your password, no characters will be displayed in the input field for security reasons, and the cursor will not move as you type your password. This is normal.

If you have forgotten the root password, it can be reset by selecting your server in the My Services section of the billing system, going to the Management tab, and selecting the Reset root password command.

Connecting via PuTTY

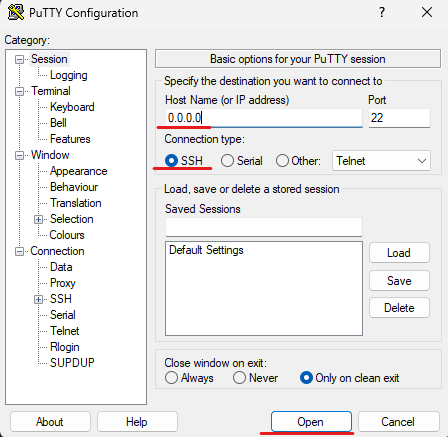
If you are using an earlier version of Windows, SSH access is provided through third-party programs such as PuTTY. Download and install the program for free. When you open PuTTY for the first time, you will see a settings window. In the Host Name (or IP address) column, enter the server IP. The IP can be checked in the billing system by selecting the server in the My Services section. The default connection port is 22, change the value if necessary. Make sure the connection type is SSH. Click the Open button.
SSH incruction 2

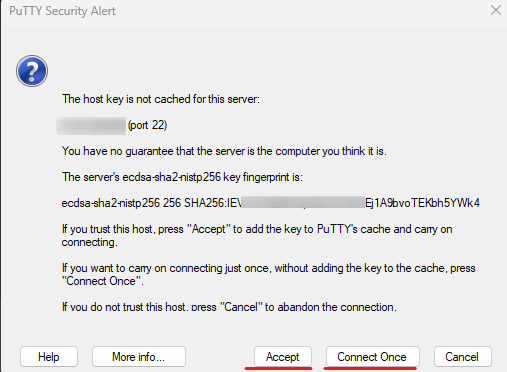
When you connect for the first time, PuTTY Security Alert will ask you to choose whether to trust the server in the future and add information about it to the cache (Accept), or connect once without “remembering” the server (Connect Once).
SSH incruction 3

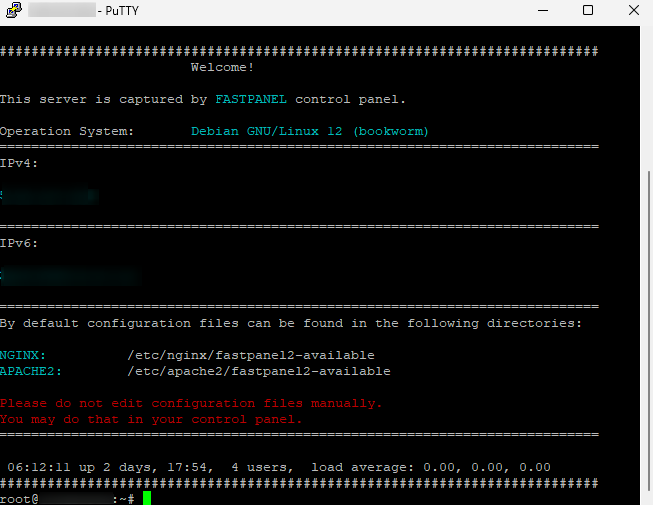
If you select Accept or Connect Once, a terminal window will appear allowing you to enter your username and password to log into the server. When entering a password, no characters will be displayed, this is normal and is done for security purposes. If there is an error when entering data, you will see the message Access denied. If the connection is successful, a server command line prompt will appear, for example,
root@qwerty123:~#

SSH incruction 4

This completes the connection process. You can enter other commands and they will be executed on the remote server.

Connection via SSH on Linux and MacOS with login and password

The SSH client comes pre-installed on all Linux systems and MacOS. You can use it from the terminal. In Linux, the terminal can be opened from the main menu or by pressing Ctrl+Alt+T. In MacOS, to connect via SSH, the Terminal utility that comes with the OS is most often used. In the terminal, enter the ssh command with the username and server IP.

where root is the username and 5.45.119.119 is the server IP address. The IP can be checked in the billing system by selecting the server in the My Services section. If necessary, specify the connection port using the -p option:

After this, a password request will appear:

[email protected]'s password:

Enter the password you received by following the link in the “Access Details” email. This completes the connection process. You can enter other commands and they will be executed on the remote server.

Authorization using SSH key

Authorization via SSH key is a fast, convenient and more secure way of authorization. To set it up, you first need to generate an SSH key.

Creating an SSH key on Windows 10

Open PowerShell in administrator mode (Run as administrator in the Start menu). Enter the command ssh-keygen and see the result:

Generating public/private rsa key pair.
Enter file in which to save the key (C:\Users\user/.ssh/id_rsa):
Enter passphrase (empty for no passphrase):
Enter same passphrase again:
Your identification has been saved in C:\Users\user/.ssh/id_rsa.
Your public key has been saved in C:\Users\user/.ssh/id_rsa.pub.

During the key creation process, the console will ask you to agree to save the key in the default file (.ssh/id_rs) or enter a new address, as well as enter a passphrase.

Passphrase ❗ This is an additional security element of the SSH key. If you ignore entering the secret word and simply press Enter, you will not need to enter any password when logging in later. The server will automatically check the part of the key stored on your computer. However, if someone takes over your computer, they can easily connect to your servers. To avoid this, enter a passphrase.

Generating an SSH key using PuTTYgen

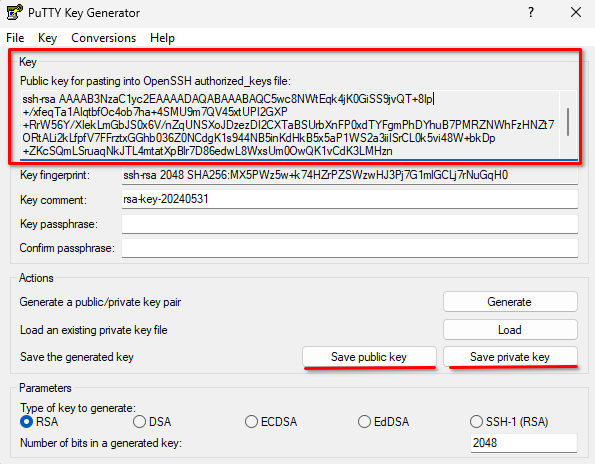
On Windows versions up to 10, it is convenient to use PuTTYgen, a utility that is installed with PuTTY by default, to create a key. Open PuTTYgen. Click on the Generate button. Move your cursor around the window when PuTTYgen asks you to do so. The key will be generated.
SSH incruction 5

Save the generated key by clicking the Save public key and Save private key buttons. Copy the Public key displayed in the program window to the clipboard (Ctrl+C).

Creating an SSH key on Linux and MacOS

On Linux and MacOS consoles, use the ssh-keygen utility to generate an SSH key.

$ ssh-keygen 
Generating public/private rsa key pair.
Enter file in which to save the key (/home/user/.ssh/id_rsa):
Enter passphrase (empty for no passphrase):
Enter same passphrase again:
Your identification has been saved in /home/user/.ssh/id_rsa
Your public key has been saved in /home/user/.ssh/id_rsa.pub

During the key creation process, the console will ask you to agree to save the key in the default file (.ssh/id_rsa) or enter a new address, as well as enter a passphrase. Read about the importance of using passphrase earlier in this article.

Placing the public part of the SSH key on the server and connecting without a password

When authorizing via an SSH key, the public part of the key located on the server is compared with the private part of the key on your computer.

After logging into the server via SSH, the actions in the console performed on the remote server will not be different for Windows, Linux and MacOS.

After connecting to the remote server using your username and password, enter the following commands. They will create a directory and file to store the key and set access rights to them

mkdir ~/.ssh
chmod 0700 ~/.ssh
touch ~/.ssh/authorized_keys
chmod 0600 ~/.ssh/authorized_keys

After this, place the public part of the SSH key you created earlier in the authorized_keys file. To do this, copy the contents of the id_rsa.pub file (if the key was created in PuTTYgen, you could copy the key directly from the program window). Open the authorized_keys file in a console editor, for example nano.

nano ~/.ssh/authorized_keys

Paste the contents of the clipboard into the file (Ctrl+V) and close the editor with the keyboard shortcut Ctrl+X and pressing Y to save the changes. On Linux and MacOS, instead of these manipulations, you can use a command that automatically transfers the public part of the key to a remote server:

ssh-copy-id [email protected]

where root is the username, and 5.45.119.119 is the IP address of the server to which the key should be sent.

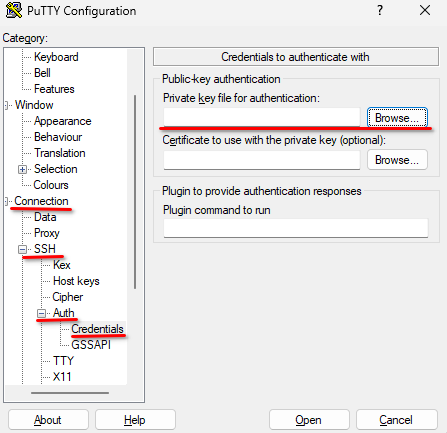
The public key was successfully transferred to the remote server. Now, when connecting to the server with the command ssh [email protected], you do not need to enter a password, but you will need to enter a passphrase if it was created when generating the SSH key. If you connect to a remote server via PuTTY, to authorize using a key, enter the path to the file containing the private part of the key in the Connection - SSH - Auth settings in the Private key file for authentication column.
SSH incruction 6

Adding SSH keys to the billing system

A convenient way to authorize on kodu.cloud servers is to add SSH keys in the billing system. Go to the My Account - SSH Keys section. There you can download the public part of SSH keys, which will be automatically added to your servers for convenient and secure authorization. The keys will only be available when ordering new servers and after reinstalling the OS or starting recovery mode on the servers you are already using.

You can start reinstalling the OS on your servers in the billing system by selecting the server in the My Services section, going to the Management tab and selecting the Reinstall OS option. At this stage, you will be able to select an SSH key from those previously loaded into the billing system for further authorization on the server.

[Order VPS kodu.cloud] (https://kodu.cloud/vps) and try setting up authorization using an SSH key, and our support team will be happy to help and answer any questions.

Types of Hosting — Guide to Picking the Best for Your Website | kodu.cloud

· 4 min read
Customer Care Engineer

What are the differences and why is it really important to understand it?

Are you just creating your first Internet project or are there some reasons to transfer an existing one to a new server? Then you must be considering which type of hosting would work well for you.

It's quite easy to make a choice if you're familiar with the main categories. There are countless offers on the market, differing significantly in price and support only. Yet, the type, quality and even cost are crucial for the successful development of your project. So, let see basic types of hosting closely:

Types of Hosting illustration 1

Shared Hosting

If you're only thinking about purchasing space to host your website, you're likely thinking of virtual hosting. It's a service for placement websites on servers where each site has allocated space. Websites share resources such as disk space, RAM, and IP addresses.

In this case, if a neighbor on the same IP turns out to be "bad," your site also risks being unavailable or penalized in search engine rankings. Additionally, the technical limitations of shared hosting impose several restrictions:

  • The provider may limit the number of hosted sites and databases
  • Unable to use emailing
  • Connecting additional modules (alternative email clients or antivirus) is impossible
  • To prevent overloading the shared server, there's often a limit on process duration: a long task (e.g., data import) will be forcibly stopped. This can cause many problems when working with large projects.
  • SSH access is often absent or severely restricted, making working with sites on frameworks and advanced administration difficult.
  • Website owners don't have enough rights to install many software or system updates. So, most of the settings are limited; it's a basic/entry-level type of hosting that lacks advanced features or customization options.

Experienced website owners tend to avoid shared hosting because the small economy compared to VPS servers doesn't pay off, and it has massive risks for any project.

Virtual Private Server (VPS) Rental

It’s like belonging to your dedicated server, but virtual and without the hefty price tag. A virtual machine mimics the real server, so you have complete control over such a server: root access, any software installation, or deep customization and configuration. A VPS has its own IP and is securely isolated from other virtual machines located on the same server.

VPS hosting unlocks a world of possibilities, not just for websites. VPNs, proxies, databases, NoSQL solutions, Docker, and specialized software can all be implemented. On a separate server, even if it's virtual, the possibilities for configuring and deploying custom projects are significantly broader compared to other hosting options.

The key advantage of VPS storage is that you're essentially the owner of your virtual server, with independent command over its service quality. Server administration becomes effortless with user-friendly and often free control panels like FASTPANEL.

This is a go-to solution for launching websites and for projects with moderate traffic.

Physical/dedicated Server: Purchase OR Rent

If you have a large project that requires significant resources and cannot tolerate being hosted alongside others, then buying your own server might be the best option. However, the cost will be substantial, and it will be accompanied by ongoing expenses for colocation (housing your equipment in a rented rack in a data center) or maintaining your own infrastructure: cooling, power stability and backup, repairs, internet connection, etc. Purchasing makes sense if the cost of renting high-quality equipment for an extended period exceeds the price of acquisition and if you are ready to keep your own system administrators who manage your self-hosted servers.

A healthy alternative to purchasing is renting it. A dedicated server of your own is a separate physical machine located in a data center, with which you interact remotely. Since you're renting rather than buying, the responsibility for maintaining the equipment falls on the service provider.

A dedicated server is the go-to choice for projects with large amounts of content and traffic, such as:

  • Highly trafficked websites: large e-commerce stores or news websites
  • Internet services: gaming platforms, streaming video, large file storage, online cinemas, etc

Cloud Hosting

By choosing cloud type of hosting, you get a virtual machine located on a cluster of servers, enabling dynamic resource allocation among clients based on their needs. The cloud eliminates potential downtimes associated with technical maintenance or failures of individual servers.

The payment system is a significant difference vs others. You pay not for the configuration but for the resources consumed: for CPU usage per hour, for network traffic in GB, etc. The more resources your project consumes, the proportionally more you pay for cloud hosting. You don't know how much you have to pay until the end of a month. On average is costs more than other types of hosting.

This type is perfect for high demand complex international resources. You can control your servers via API. Disadvantage is that cloud hosting platfroms are very complicated and even many programmers prefer not to spend so much time to deal with them.

In general, cloud hosting is build for strong technical teams who need maximum control, advanced features and are ready to spend more on hosting.

Types of Hosting illustration 2

At kodu.cloud we offer several options of hosting

-View VPS plans on kodu.cloud

If you lack not only the skills but also the desire to administer your virtual server independently, choose a suitable fully managed plan where all maintenance tasks will be handled by a remote team of technical experts.

-View fully managed VPS plans on kodu.cloud

Renting a VPS is the most flexible service on the market: suitable for both blog owners and owners of online stores or corporate portals.

-View our dedicated servers

The cost of server hosting should not consume too large a portion of the funds allocated for project development. Fortunately, the variety of offers and configurations allows you to find the optimal hosting solution for any need. Contact kodu.cloud team to receive detailed recommendations and assistance in choosing the plan and calibrating resources according to your needs.

VPS with Windows Server - Flexibility & Security

· 2 min read
Customer Care Engineer

What is a VPS with Windows Server?

VPS (Virtual Private Server) with Windows Server is a virtual server operating on the Windows Server OS. It provides an isolated environment with dedicated resources, allowing it to be used for various tasks like a physical server but with greater availability and scalability.

Windows VPS illustration 1

Advantages of VPS with Windows Server:

If your project relies on ASP or ASP.net, you'll need to use a Windows environment. You can choose your preferred Windows operating system: Windows Server 2012R2 or Windows Server 2019.

Familiar interface:

Simple system with a remote desktop and graphical interface.

Scalability:

Easily add or remove VPS resources without significant server downtime.

Manageability:

VPS with Windows Server comes with pre-installed management tools, simplifying administration.

Compatibility:

Windows Server works with a wide range of applications and software.

Speed:

Windows VPS enhances performance in data-intensive tasks (MS SQL, MS Access) and areas with complex business processes, improving functions like accounting, sales, trade, and banking (e.g., Symfonia, Subiekt, Comarch, SharePoint, internal CRM).

Use cases for VPS with Windows Server:

Website and web application owners:

Ideal for hosting websites, web applications, databases, and other online solutions.

Software developers:

Provides a secure and isolated environment for software development and testing.

Gamers:

Windows Server VPS can be used for hosting game servers.

Entrepreneurs:

VPS can be used to create a VPN server, ensure secure remote access to your network, store files, and back up data. It can also be used to create virtual desktops, enabling remote work from any device.

How to choose VPS with Windows:

Determine your needs:

How much CPU, RAM, and disk space do you need? What applications will you run on the VPS?

If your project relies on ASP or ASP.net, you must use a Windows environment: Windows Server 2012R2 or Windows Server 2019.

Choose a hosting provider:

Select a reliable provider with a good reputation and reviews.

Compare prices:

Compare VPS prices from different providers, considering not only hosting costs but also additional expenses for technical support. kodu.cloud offers premium 24/7/365 technical support.

Windows VPS illustration 2

Choosing disks for VPS (SSD, NVMe, HDD):

HDD:

Affordable disks with high capacity but low read/write speeds. Suitable for backup, data storage, and streaming tasks like video encoding.

SSD:

High-speed disks suitable for databases, high-traffic applications, and files requiring fast access. Limited in data rewrite operations.

NVMe:

Highest read/write speeds, exceeding regular SSDs. Suitable for high-performance applications, but may have limited rewrite resources. Ideal for storing many files or a database with a focus on reading.

Conclusion:

A Windows VPS is a virtualized environment that acts like a dedicated physical server, providing you with full administrative control. While it shares a host with other VPS instances, resource allocation guarantees independent performance. Windows VPS is ideal for projects built with ASP or ASP.net technologies. Select your desired Windows Server version (2012R2 or 2019) and enjoy a pre-installed, ready-to-use Windows setup.

Choose your Windows VPS:

Select from our tariff plans based on Hyper-V technology and fast SSD disks, according to your project's parameters:

Choose Managed Windows VPS plan

kodu.cloud tariff includes:

automatic backup

24/7/365 premium technical support

Linux VPS Hosting - What is and How to Choose?

· 3 min read
Customer Care Engineer

What is a Linux VPS?

VPS (Virtual Private Server) is a virtual dedicated server, which is part of a physical server divided into several virtual machines. VPS with Linux is a virtual server running the free and open source Linux operating system. It is a go-to solution for 95-99% of cases.

Benefits of VPS with Linux

A Linux VPS has all the benefits of a physical server, but Linux is free, open source, and gives you full access and control to customize your server as you see fit. There are many Linux distributions available, including CentOS and Ubuntu, each with its own benefits and use cases. Windows operating systems are expensive and offer much less flexibility and customization options.

Linux VPS illustration 1

VPS with Linux provides:

Dedicated Resources:

A certain amount of CPU, RAM, and disk space is guaranteed.

Full control:

Full access to the server and you can install any software compatible with Linux and necessary for your tasks.

Scalability:

It's easy to increase or decrease the resources of your VPS depending on your needs.

Use Cases for a Linux VPS

A Linux VPS can be used for a variety of purposes, including:

Web hosting:

A Linux VPS is a great solution for hosting websites on WordPress, Drupal, OpenCart, Joomla, Magento, and other applications. It provides high performance, reliability, and security.

Development and testing:

A Linux VPS is a great platform for developing and testing software. It allows you to create an isolated development environment that helps to avoid conflicts with other applications.

Data storage:

A Linux VPS can be used to store data. It provides high reliability and security.

Game servers:

A Linux VPS is a popular solution for hosting game servers. It provides high performance and low latency, which is necessary for a good gaming experience.

How to Choose a Linux VPS

When choosing a Linux VPS, you should consider:

Your needs:

What do you need the VPS for? What applications will you be running on it? How many users will be working with the server simultaneously?

The resources you need:

How much CPU, RAM, and storage space will you need?

The Linux distribution:

There are many distributions of Linux available, each with its own features.

The cost:

Consider the price of the hosting itself, as well as any additional costs for a control panel and technical support.

Which disks to choose for a VPS (SSD, NVMe, HDD)

HDD:

The most affordable type of disk. They have a large capacity but low read/write speed, suitable for backup, data storage, and streaming, e.g. video encoding.

SSD:

They are characterized by high read and write speed, but have limitations on data rewriting up to several million operations. Used for databases, high-load applications, and file storage, which require fast access.

NVMe:

They have the highest read and write speeds, several times higher than regular SSDs, but their rewrite resource is no higher than that of regular SSDs. When working with applications requiring high performance, the disk resource can be exhausted quickly. Suitable for storing a lot of files, or for a database if the main load is reading.

Linux VPS illustration 2

We regularly update our OS templates, so you can always install the latest version of a particular Linux distribution on your server.

The most popular distributions are: Ubuntu, Debian, Alma, and Rocky.

Ubuntu:

One of the most popular Linux distributions. It is easy to use and has a large community of users. Suitable for beginners and experienced users. Offers a wide range of software. If you need help deciding which distribution to choose, we recommend starting with Ubuntu.

Debian:

A stable and reliable Linux distribution. Suitable for servers that need to run without interruption. Offers a wide selection of software packages. Ideal for those who value stability and security.

AlmaLinux:

A new distribution created by the CentOS community. Compatible with CentOS Stream. Offers high stability and security. Ideal for those who want to use CentOS Stream without a subscription.

Rocky Linux:

Another new distribution created by the CentOS community. Compatible with Red Hat Enterprise Linux. High performance and reliability. Ideal for those who want to use Red Hat Enterprise Linux without paying.

Configure your Linux VPS

Choose one of our tariffs, according to the parameters of your project and your server management skills:

Virtual servers VPS

Fully managed VPS hosting

kodu.cloud tariff includes:

–automatic backup

24/7/365 premium technical support

free, easy, and intuitive server control panel FASPANEL

KVM VPS | Reliability, Speed and Performance | kodu.cloud

· 4 min read
Customer Care Engineer

The History of KVM: The Evolution of Virtualization

KVM VPS (Kernel-based Virtual Machine) is a product that has come to answer dynamically growing needs with regard to the effective virtualization of servers. KVM technology had been worked on within the specters of the Linux project but first stepped towards daylight in the year 2006 and shortly inflamed the Web hosting market as a truly dedicated Virtual Private Server (VPS) solution. Its development is motivated by the needs of isolation and security for the virtual environments, with efficiency in the utilization of server hardware resources.

Thanks to this technology, it became possible to obtain virtual machines on a single physical server that are very close in capabilities to the physical server itself. VPS existed before, but it is KVM that allows running the same services and applications on a VPS as on a physical server. Moreover, it is relatively simple to set up and versatile compared to its predecessors.

KVM VPS illustration

What is KVM VPS?

KVM VPS, operating on KVM technology, empowers users with complete server control, enabling them to isolate resources and tailor them to specific needs.

KVM technology uses virtualization functions built into the Linux kernel to create virtual machines. It allows each virtual machine to operate as a separate instance of the operating system, completely isolated from other machines on the host, i.e., the physical server.

Advantages of KVM VPS

- Resource Isolation:

Each virtual server receives dedicated resources, ensuring stable performance. If you have a KVM VPS and another VPS on the same physical server starts consuming an excessive amount of resources, it will practically not affect the operation of your virtual machine. If each VPS also has a dedicated IP address, you minimally depend on "neighbors" in terms of SEO. We at kodu.cloud provide a separate IP address for each VPS on all tariffs.

- High Performance:

Thanks to the use of full virtualization, KVM VPS achieves a high level of performance. Essentially, performance will be limited by how much of the physical server's resources are allocated to a particular VPS.

- Configuration Flexibility:

VPS users can adjust their server's parameters according to the requirements of their project. That is, you can "tweak" server settings if you need to have a longer request wait time, handle large files, work efficiently with a large database, etc.

- Security:

Resource isolation and the ability to use various security mechanisms make KVM VPS a reliable choice for storing and processing confidential data.

- Support for Various Architectures:

KVM, unlike container virtualization, can run virtual machines with architectures including, but not limited to, x86, x86_64, ARM, PowerPC. This allows using KVM for a wide range of tasks, from software development and testing to deploying servers in the cloud.

- Support for Various OS:

KVM allows running virtually any operating system without changes, including Windows, Linux, Unix, and others.

Drawbacks of KVM VPS

However, there are some drawbacks:

- Demands on Host System Resources:

Each virtual machine requires certain resources from the host system, which can lead to limitations in use. Fewer KVM virtual machines can be placed on a single physical server compared to, for example, OpenVZ. Consequently, KVM tends to be somewhat more expensive.

- Management Difficulties:

Setting up and managing KVM VPS may require some technical skills. At kodu.cloud, you get a user-friendly control panel, which even a novice can easily manage. We provide it free of charge, unlike other panels that usually cost from 15-20 euros per month. If you encounter difficulties, our support service will always help.

Comparison with Other Types of Virtualization

KVM VPS is more preferential than other technologies, such as OpenVZ, because of better isolation and flexibility in configuration, thus perfect for demanding applications based and resource-intensive applications. Compared to VMware, KVM is more affordable.

Disadvantages of OpenVZ and VMware

Unlike KVM, OpenVZ provides a more lightweight virtualization but may face limitations in resource isolation between virtual environments. Neighboring VPS can affect each other's operation. The biggest drawback is that OpenVZ simply does not allow the installation of many programs, operating system versions. It also has other disadvantages. We at kodu.cloud have opted out of using OpenVZ virtualization in favor of greater stability and efficiency of KVM. VMware, although offering high flexibility and isolation, is more expensive compared to KVM.

Services Better Run on KVM than on OpenVZ

Some services require full virtualization for stable operation, which is only provided by KVM VPS. Technically, they can also be installed on OpenVZ, but there will not be stable operation. These include:

- Docker Containers:

For deploying and managing containerized applications with a high degree of isolation.

- VPN Servers:

To provide a secure connection between remote users and your network.

KVM VPS illustration

Cost of Different Types of VPS

When it comes to the cost of virtual private servers (VPS), it is important to consider both budgetary and functional aspects. For example, prices for KVM VPS are usually somewhat higher than for OpenVZ, as they provide a high degree of isolation and performance due to full virtualization. OpenVZ uses containerization for more lightweight virtualization.

VMware VPS are more expensive. They offer high flexibility and isolation, just like KVM. They are often chosen by corporations and large companies.

Cloud VPS offer pay-as-you-go resource usage, which can vary significantly, starting from a few dollars a month if the VPS is almost unused. On average, however, for the same workload, cloud servers are more expensive by 7-10 times. They are used by those who know exactly why they need them for a specific project.

When choosing a VPS, consider both budgetary constraints and project requirements for performance, isolation, and flexibility.

KVM rightfully leads today's VPS virtualization technology. It offers an optimal combination of price, performance, and capabilities. If you need to host a WordPress site, install Docker, a development environment, CRM system, then choose KVM. If it's a custom project written specifically for you, also choose KVM.