How to Connect to a Server via SSH? Follow These Steps!
SSH (Secure Shell) is an encrypted network protocol for remote control of an operating system and file transfer. It is the primary method for working with a server through the command line. On kodu.cloud servers, it is available by default. This article will guide you on how to connect to a server via SSH on Windows, Linux, and MacOS, as well as authorizing through SSH keys.
SSH Connection on Windows
Starting with 1, the Windows command line can work with the built-in OpenSSH client. Before that, SSH on Windows worked through a third-party program, one of the popular clients was PuTTY. Below, we will discuss connecting through the built-in Windows 11 client, and then briefly describe connecting through PuTTY. When connecting, you can use your login and password to log in, or you can configure authorization by SSH key. Let's start with the first method, and in the second half of the article, we will learn how to use an SSH key.
SSH Connection in Windows 11 with Login and Password
As a rule, OpenSSH is pre-installed in Windows 11 Professional Edition. In Windows 11 Home Edition, you need to install the OpenSSH client. We will use the PowerShell console to work with SSH.
Open PowerShell. To do this, press the WIN (Windows flag key) and start typing "PowerShell" or find it in the list of programs in the Start menu. Try entering the command ssh. If the prompt usage: ssh [-46AaCfGgKkMNnqsTtVvXxYy] [-B bind_interface]... appears in the console, everything is fine. If the console does not recognize the ssh command, check if OpenSSH is installed using the command in PowerShell.
Checking for and Installing OpenSSH
Open the PowerShell console, selecting the option Run as Administrator. Enter the following command:
Get-WindowsCapability -Online | ? Name -like 'OpenSSH.Client*
In our case, OpenSSH is installed.
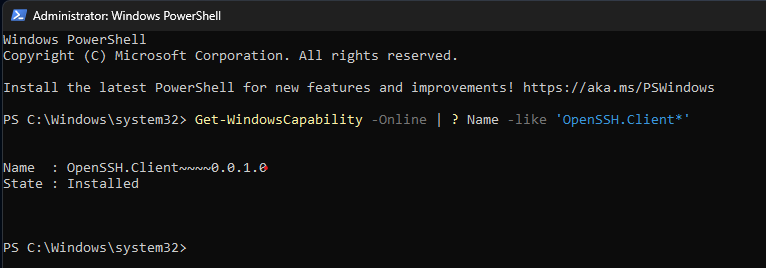
If the command returns a result, then OpenSSH is installed. If not, install it using the following command:
Add-WindowsCapability -Online -Name OpenSSH.Client*
Or through Windows 11 settings (Settings - Apps - Features - OpenSSH Client), but this method may not work on Windows 11 Home Edition.
Connecting to the Server
Requirements for authorization on the server: server IP address, username, password. Upon service activation, you received an email with the root user access credentials. Please save them. If necessary, the root password can be reset through the billing system.
In the PowerShell console, enter the ssh command with the username and server IP address.
Where root is the username and x.xx.xxx.xxx is the server IP address. You can find the IP address in the billing system by selecting the server in the My Services section. If necessary, specify the connection port using the -p option:
ssh [email protected] -p 22
After this, a password request will appear:
[email protected]'s password:
Enter the password you received by clicking on the link in the "Access Credentials" email. This completes the connection process. You can now enter other commands, and they will be executed on the remote server.
❗ Attention: When entering your password, no characters will be displayed in the input field for security reasons, and the cursor will not move as you type your password. This is normal.
If you have forgotten the root password, it can be reset by selecting your server in the My Services section of the billing system, going to the Management tab, and selecting the Reset root password command.
Connecting via PuTTY
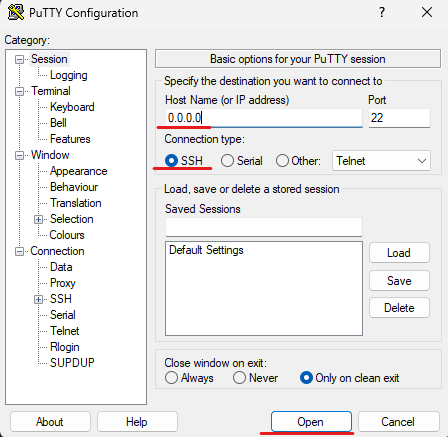
If you are using an earlier version of Windows, SSH access is provided through third-party programs such as PuTTY. Download and install the program for free. When you open PuTTY for the first time, you will see a settings window. In the Host Name (or IP address) column, enter the server IP. The IP can be checked in the billing system by selecting the server in the My Services section. The default connection port is 22, change the value if necessary. Make sure the connection type is SSH. Click the Open button.
When you connect for the first time, PuTTY Security Alert will ask you to choose whether to trust the server in the future and add information about it to the cache (Accept), or connect once without “remembering” the server (Connect Once).
If you select Accept or Connect Once, a terminal window will appear allowing you to enter your username and password to log into the server. When entering a password, no characters will be displayed, this is normal and is done for security purposes. If there is an error when entering data, you will see the message Access denied. If the connection is successful, a server command line prompt will appear, for example,
root@qwerty123:~#
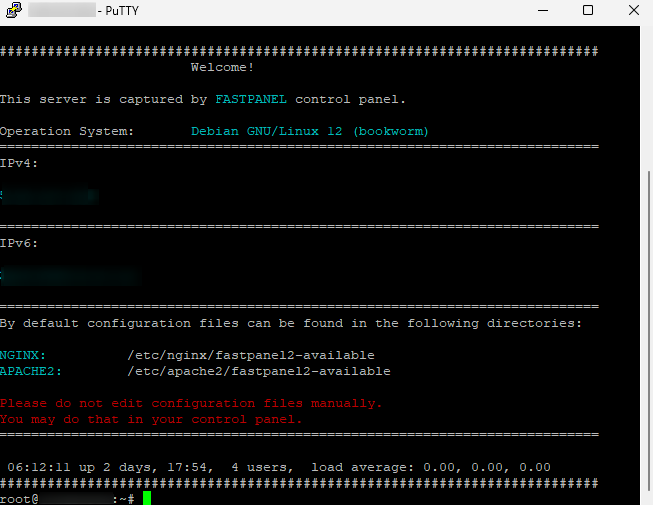
This completes the connection process. You can enter other commands and they will be executed on the remote server.
Connection via SSH on Linux and MacOS with login and password
The SSH client comes pre-installed on all Linux systems and MacOS. You can use it from the terminal. In Linux, the terminal can be opened from the main menu or by pressing Ctrl+Alt+T.
In MacOS, to connect via SSH, the Terminal utility that comes with the OS is most often used.
In the terminal, enter the ssh command with the username and server IP.
where root is the username and x.xx.xxx.xxx is the server IP address. The IP can be checked in the billing system by selecting the server in the My Services section. If necessary, specify the connection port using the -p option:
ssh [email protected] -p 22
After this, a password request will appear:
[email protected]'s password:
Enter the password you received by following the link in the “Access Details” email. This completes the connection process. You can enter other commands and they will be executed on the remote server.
Authorization using SSH key
Authorization via SSH key is a fast, convenient and more secure way of authorization. To set it up, you first need to generate an SSH key.
Creating an SSH key on Windows 11
Open PowerShell in administrator mode (Run as administrator in the Start menu). Enter the command ssh-keygen and see the result:
Generating public/private rsa key pair.
Enter file in which to save the key (C:\Users\user/.ssh/id_rsa):
Enter passphrase (empty for no passphrase):
Enter same passphrase again:
Your identification has been saved in C:\Users\user/.ssh/id_rsa.
Your public key has been saved in C:\Users\user/.ssh/id_rsa.pub.
During the key creation process, the console will ask you to agree to save the key in the default file (.ssh/id_rs) or enter a new address, as well as enter a passphrase.
Passphrase ❗ This is an additional security element of the SSH key. If you ignore entering the secret word and simply press Enter, you will not need to enter any password when logging in later. The server will automatically check the part of the key stored on your computer. However, if someone takes over your computer, they can easily connect to your servers. To avoid this, enter a passphrase.
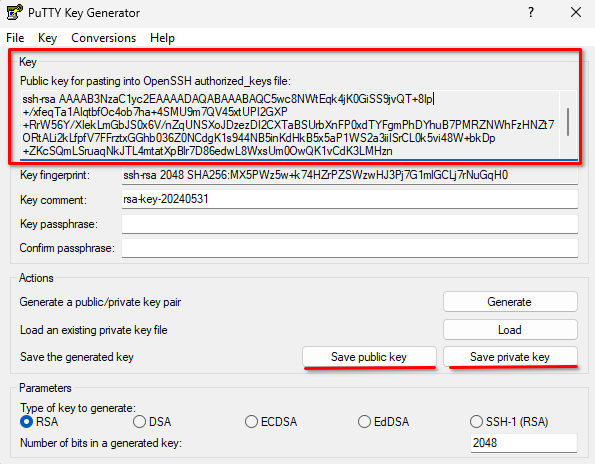
Generating an SSH key using PuTTYgen
On Windows versions up to 10, it is convenient to use PuTTYgen, a utility that is installed with PuTTY by default, to create a key. Open PuTTYgen. Click on the Generate button. Move your cursor around the window when PuTTYgen asks you to do so. The key will be generated.
Save the generated key by clicking the Save public key and Save private key buttons. Copy the Public key displayed in the program window to the clipboard (Ctrl+C).
Creating an SSH key on Linux and MacOS
On Linux and MacOS consoles, use the ssh-keygen utility to generate an SSH key.
$ ssh-keygen
Generating public/private rsa key pair.
Enter file in which to save the key (/home/user/.ssh/id_rsa):
Enter passphrase (empty for no passphrase):
Enter same passphrase again:
Your identification has been saved in /home/user/.ssh/id_rsa
Your public key has been saved in /home/user/.ssh/id_rsa.pub
During the key creation process, the console will ask you to agree to save the key in the default file (.ssh/id_rsa) or enter a new address, as well as enter a passphrase.
Read about the importance of using passphrase earlier in this article.
Placing the public part of the SSH key on the server and connecting without a password
When authorizing via an SSH key, the public part of the key located on the server is compared with the private part of the key on your computer.
After logging into the server via SSH, the actions in the console performed on the remote server will not be different for Windows, Linux and MacOS.
After connecting to the remote server using your username and password, enter the following commands. They will create a directory and file to store the key and set access rights to them
mkdir ~/.ssh
chmod 0700 ~/.ssh
touch ~/.ssh/authorized_keys
chmod 0600 ~/.ssh/authorized_keys
After this, place the public part of the SSH key you created earlier in the authorized_keys file. To do this, copy the contents of the id_rsa.pub file (if the key was created in PuTTYgen, you could copy the key directly from the program window).
Open the authorized_keys file in a console editor, for example nano.
nano ~/.ssh/authorized_keys
Paste the contents of the clipboard into the file (Ctrl+V) and close the editor with the keyboard shortcut Ctrl+X and pressing Y to save the changes. On Linux and MacOS, instead of these manipulations, you can use a command that automatically transfers the public part of the key to a remote server:
ssh-copy-id [email protected]
where root is the username, and x.xx.xxx.xxx is the IP address of the server to which the key should be sent.
The public key was successfully transferred to the remote server. Now, when connecting to the server with the command ssh [email protected], you do not need to enter a password, but you will need to enter a passphrase if it was created when generating the SSH key.
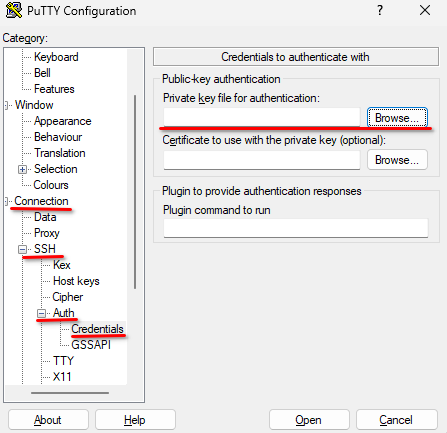
If you connect to a remote server via PuTTY, to authorize using a key, enter the path to the file containing the private part of the key in the Connection - SSH - Auth settings in the Private key file for authentication column.

Adding SSH keys to the billing system
A convenient way to authorize on kodu.cloud servers is to add SSH keys in the billing system. Go to the My Account - SSH Keys section. There you can download the public part of SSH keys, which will be automatically added to your servers for convenient and secure authorization. The keys will only be available when ordering new servers and after reinstalling the OS or starting recovery mode on the servers you are already using.
You can start reinstalling the OS on your servers in the billing system by selecting the server in the My Services section, going to the Management tab and selecting the Reinstall OS option. At this stage, you will be able to select an SSH key from those previously loaded into the billing system for further authorization on the server.
[Order VPS kodu.cloud] (https://kodu.cloud/vps) and try setting up authorization using an SSH key, and our support team will be happy to help and answer any questions.