ULTIMATE GUIDE: Setting Up Your Server for Reliable Email Delivery. PART 2: How to prevent outgoing emails from going to spam

DNS records are a set of technical parameters of a domain that determine where to route different types of traffic: web, mail, FTP, etc.
They link the domain name to IP addresses and other servers so that browsers and mail systems know where to connect when working with your website or email.
In Part 1 of this guide, we configured the firewall and opened the necessary ports for mail delivery. Now that we have made sure that messages are being sent from your server, we need to check that the DNS records are configured correctly. Gmail, Outlook, and other major mail services strictly verify MX, SPF, DKIM, DMARC, and PTR before delivering messages to the primary inbox. Correct records sharply increase the chance that messages will land in the Inbox folder instead of Spam (or be completely rejected).
In the following steps, we will describe how to check the current DNS records of each type and provide recommendations on how to configure them correctly.
In this part of the article, for all checks we use the domain example.com, IPv4 address 1.2.3.4 and IPv6-Address 2001:db8:1:11::1 as examples. Please replace them with the real name of your website and your actual IP addresses.
Pre-requisites
Step 1. Checking the DNS provider
In the context of this article, we will need to edit DNS records multiple times. This must be done in the control panel of the current DNS provider for your domain. To do this correctly, you need to know exactly who is providing these services right now. Otherwise, the changes you make will have no effect.
Most often the role of DNS provider is performed by:
-
your hosting provider,
-
your domain registrar, or
-
your DDoS protection provider.
But this is not always the case.
You can find out exactly who is the DNS provider for your domain at the moment using the whois command. For example, let us check the domain kodu.cloud:
whois kodu.cloud | grep -i "Name Server" | awk '{print $3}'
The output will list the NS servers:
art.ns.cloudflare.com
isla.ns.cloudflare.com
That means that in this case DNS records must be edited in the Cloudflare control panel.
In many cases, you can infer who the DNS provider is from the domain name. However, this is not always so. For example, for our free DNS service, which is available to all our customers, the names look like this:
birman.nameserver.red.
rex.nameserver.red.
korat.nameserver.blue.
toybob.nameserver.blue.
In this case, please contact your hosting provider’s technical support for further clarification.
After you have definitively identified your DNS provider, log in to their control panel and go to the section for editing DNS records for your domain. Most of the changes described below will be made there. Since all interfaces differ, it is impossible to provide a universal step-by-step guide.
If you encounter difficulties at this stage, consult technical support.
After changing DNS records, cache propagation can take from 20 minutes to 24 hours. Taking into account the time required for major mail services to update your reputation, for stable mail delivery it is recommended to wait about 48 hours, although more often the situation normalizes after 2-3 hours.
Step 2. Checking for IPv6
For correct configuration, we need to know exactly whether the server has an IPv6 address. To find out, run the command:
ip a | grep inet6
If the output is approximately as follows:
inet6 ::1/128 scope host noprefixroute
inet6 2001:db8:1:11::1/120 scope global
inet6 fe80::1/64 scope link
then your server has an IPv6 address. It will be shown on the line ending with scope global up to the / sign.
Write down your server’s IPv6 address so that you can use it later.
If the output is empty, or contains only a single line of the form:
inet6 fe80::1c2:3dff:fe4a:5b6c/64 scope link
then your server does not have IPv6. In all subsequent steps, please do not use IPv6.
DNS record configuration
Step 3. Checking the MX record
The MX record specifies where incoming mail for the domain should be delivered. You can check it with the command:
dig MX example.com +short
Example of correct output:
10 mail.example.com.
If the output shows an incorrect value, edit the DNS record in your DNS provider’s control panel:
- Type: MX
- Name: @
- Address: mail.example.com
- Priority: 10
If the record is missing, you will get an empty output:
~ dig MX badexample.com +short
~
In this case, create a DNS record following the above example.
Also note that there can be several MX records. In this case, mail will first be sent to the server with the smaller numeric priority value (for example, 10 has a higher priority than 20).
If the primary server is unavailable, delivery will be performed to the next server in order of priority.
Step 4. Checking A and AAAA records
Next, make sure that mail.example.com and example.com actually point to the server from which messages are being sent:
dig A example.com +short
dig A mail.example.com +short
dig AAAA example.com +short
dig AAAA mail.example.com +short
The IP addresses in the output of these commands must match the actual IPv4 and IPv6 addresses of your server. If they differ, or if such records are missing, edit or create them in your DNS provider’s control panel:
- example.com (А):
- Type: A
- Name: @
- Address: 1.2.3.4
- example.com (АAAA):
- Type: AAAA
- Name: @
- Address: 2001:db8:1:11::1
- mail.example.com (A):
- Type: A
- Name: mail
- Address: 1.2.3.4
- mail.example.com (AAAA):
- Type: AAAA
- Name: mail
- Address: 2001:db8:1:11::1
Step 5. Checking the SPF record
SPF defines which servers are allowed to send mail on behalf of the domain.
Checking the record:
dig TXT example.com +short
Example of a correct SPF record:
example.com. TXT "v=spf1 ip4:1.2.3.4 ip6:2001:db8:1:11::1 a mx ~all"
It is extremely important that the domain has only one SPF record. Multiple records can cause a validation error.
If the IP address differs from your current server address, or if such a record is missing, edit or create it in your DNS provider’s control panel:
If IPv6 is present:
- Type: TXT
- Name: @
- Value: v=spf1 ip4:1.2.3.4 ip6:2001:db8:1:11::1 a mx ~all
If there is no IPv6:
- Type: TXT
- Name: @
- Value: v=spf1 ip4:1.2.3.4 a mx ~all
The SPF record has many additional options, but this set is sufficient for correct message sending.
Step 6. Checking the DKIM record
DKIM is a digital signature of a message that confirms that it was sent from the specified domain and has not been forged. A TXT DNS record with a public key is used to verify the signature: first the signature is created on the server, and then the key is published in DNS.
There are various ways to obtain a DKIM signature for your mail domain, but within the scope of this article we will consider the simplest option - using FASTPANEL. In FASTPANEL, a DKIM signature is created for mail domains by default.
FASTPANEL is extremely convenient for working with a mail server: you do not need to configure or install anything manually. Out of the box, you get a configured mail server for full-fledged work with incoming and outgoing mail, as well as a convenient webmail client.
Therefore, all you have to do is copy the public key value and add it to the corresponding DNS record. To do this, in the panel, go to “Management” → “Mail” and click on the “DKIM” button at the end of the row with the name of your mail domain:
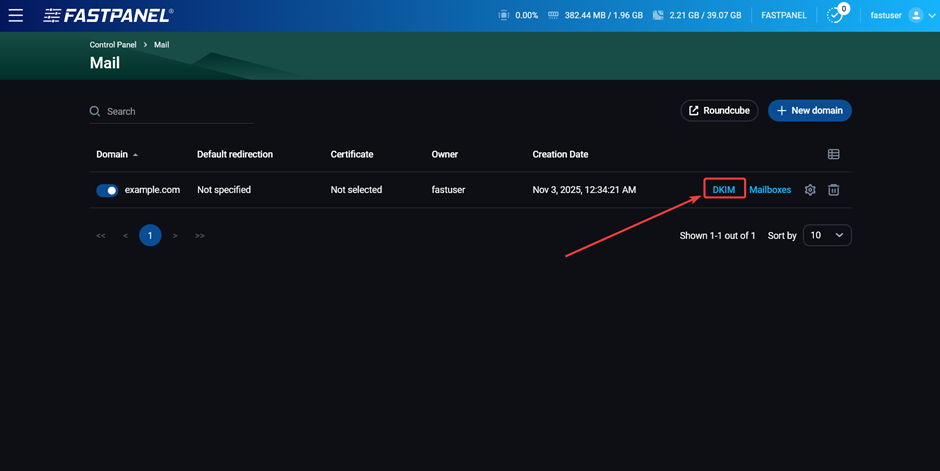
Then copy the public key:

On the side of your DNS provider, create the following DNS record:
- Type: TXT
- Name:
dkim._domainkey - Value: the key that you copied earlier
If such a record already exists, it is better to still replace the key value to be sure it is up to date.
There can be several DKIM records, but in that case they must have different names. For example, having records with the names dkim._domainkey and mail._domainkey at the same time will not cause any problems.
After configuration and DNS cache update, you can check for the presence of the DKIM record using the command:
dig TXT dkim._domainkey.example.com +short
Step 7. Checking the DMARC record
DMARC sets the rules for handling messages that fail SPF or DKIM.
Checking the record:
dig TXT _dmarc.example.com +short
Example output:
"v=DMARC1;p=reject;sp=reject;adkim=s;aspf=s"
The DMARC record has many additional options, but for common scenarios it is sufficient to add a record of the following form:
- Type: TXT
- Name:
_dmarc - Value: v=DMARC1; p=reject
Step 8. Checking the sendmail_path variable (optional)
This step will be very useful if you send messages directly from your website (for example, using contact forms or when placing orders). To ensure that all necessary DNS records are taken into account for such messages, set the following value for the sendmail_path variable in your site’s PHP settings:
/usr/sbin/sendmail -t -i -f "[email protected]"
For example, in FASTPANEL you can do this in the site card in the “PHP Settings” section.
Hostname and PTR configuration
PTR (or rDNS) is a reverse DNS record that links an IP address to a domain name.
The server Hostname is simply the name by which the server can be identified on the network.
If the PTR does not match the server hostname, messages will almost certainly end up in spam.
Best practice is to set mail.example.com as both values (remember that this value must always be replaced with the real name of your domain).
Step 9. Hostname
To find out your server’s current hostname, run the command:
hostname
To change it, run:
sudo hostnamectl set-hostname mail.example.com
Then run the hostname command again to make sure that everything is correct.
Step 10. PTR
The situation with the PTR record is somewhat different: it can be changed only by the owner of the IP address, that is, your hosting provider. You can learn more about the reasons for this from this article.
Some hosting providers allow you to edit the PTR record in your personal account. You can try to do this there yourself. If that does not work, contact technical support and ask them to set the following value as the PTR record:
mail.example.com
Remember that this value must always be replaced with the real name of your domain.
Changes are usually applied immediately; there is no need to wait for DNS cache updates in this case. You can check the current PTR record using the command:
dig -x 1.2.3.4 +short
Final check
If you have reached this section, congratulations - you are on the home stretch. Now all that remains is to verify that everything is configured correctly and that messages from your server are almost guaranteed to end up in the Inbox for any recipient. Before doing this, be sure to wait for DNS cache updates. It is best to wait at least 1-2 hours after the last changes to DNS records.
There are many third-party services for such checks. You can use any of them. In this article, we will use the mail-tester.com service.
To perform the check, go to this website and copy the name of the test mailbox:
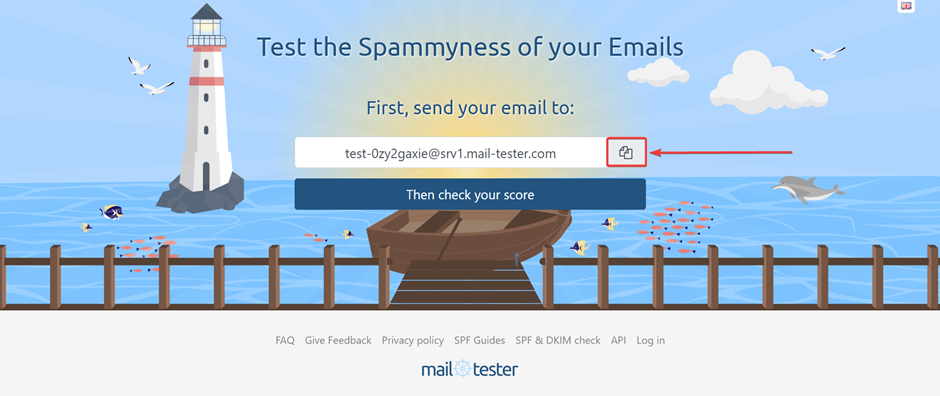
Send a message to this address from any mailbox on your domain and click the “Then check your score” button. Do not forget to specify a subject and write something in the body of the message.
After that, the service will show the results of checking DKIM, SPF, DMARC, the presence of a PTR record and an overall “reputation” score for the message, as well as whether your server is listed in SPAM blacklists.
If you have carefully and consistently followed all the steps in this article, the result will be 10/10. If it is lower, please study mail-tester’s recommendations. They will explain in detail what the problem is and how to fix it.
Additionally, you can check whether your server is listed in SPAM blacklists using another excellent service:
https://mxtoolbox.com/blacklists.aspx
If any of the checks show that your server’s IP address has ended up in one of the lists, contact your hosting provider so that they can help resolve the issue.
That concludes the configuration. If you do not want to spend time on your own research or have run into any problems, you can always contact kodu.cloud technical support. We will perform all the steps described here as quickly as possible for our clients at any time, free of charge.